Assembly code cannot lie. By reading assembly we become as close as possible to knowing what’s being run on our computer chips. This is exactly why disassembly is important! If you have a binary with malicious intentions, disassembling it will expose them. If you can’t figure out a performance bottleneck in your code, you can disassemble it for clarity.
If you’re not up to snuff on reading x86_64 assembly, don’t worry, most of us aren’t. You don’t have to read any assembly for the purpose of this post, although it may make it more interesting. For an introduction to x86 assembly I highly recommend this article.
So, what is disassembly?
Disassembly is the process of converting a compiled binary file back into assembly code. To clarify let’s first go in the direction we’re used to, from source code to a compiled binary:
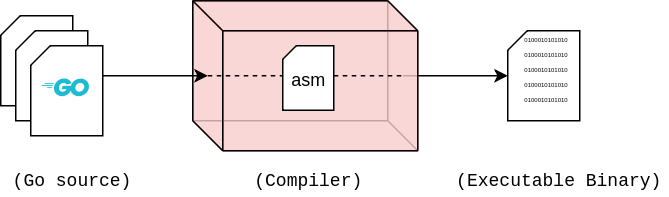
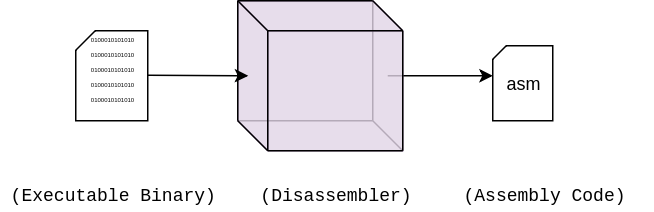
The assembly code is an intermediate form. The compiler will first turn the source code into OS/architecture specific assembly code before ‘assembling’ it into the binary file. As the name alludes to, disassembly is doing this process in reverse:
Thankfully Go has a fantastic standard toolchain that lets you play with this process. You can see the assembly code before it gets turned into 1’s and 0’s by compiling your program with the following command: go build -gcflags -S program.go. If you already have a compiled program and want to see the assembly code you can disassemble it with go tool objdump binaryFile.
We could end this post right here but I think it’d be a lot more interesting to build a disassembler ourselves. Let’s do that.
First of all, in order to build a disassembler we need to know what all of the binary machine code translates to in assembly instructions. To do this we must have a reference for all assembly instructions for the architecture of the compiled binary. If you’re not familiar with this task you wouldn’t think it’d be so difficult. However, there are multiple micro-architectures, assembly syntaxes, sparsely-documented instructions, and encoding schemes that change over time. If you want more analysis on why this is difficult I enjoy this article.
Thankfully all of the heavy lifting has been done for us by the authors and maintainers of Capstone, a disassembly framework. Capstone is widely accepted as the standard to use for writing disassembly tools. Reimplementing it would be quite a daunting, albeit educational, task so we won’t be doing that as part of this post. Using Capstone in Go is as simple as importing its cleverly named Go bindings, gapstone:
For example, you can plug the the following raw bytes (displayed in hex) through Capstone and it will translate them into the corresponding x86_64 instruction:
0x64 0x48 0x8B 0xC 0x25 0xF8 0xFF 0xFF 0xFF
Translates to:
mov rcx, qword ptr fs:[0xfffffffffffffff8]
In code and then running it looks like this:
$~ go run main.go
0x0:	mov		rcx, qword ptr fs:[0xfffffffffffffff8]
With these tools our only real task is to extract the relevant raw bytes from the binary file and feed it through Capstone’s engine.
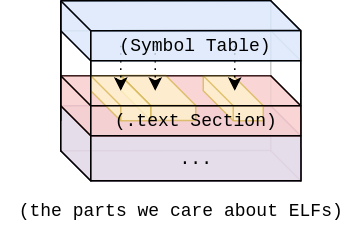
When you compile a Go program on your laptop the outputted binary will likely default to a 64-bit ELF (or Executable Linkable Format). The ELF is organized into various sections that each have a unique purpose such as storing version information, program metadata, or executable code. The ELF is a widely accepted standard for binary files and as such Go has a debug/elf package for easily interacting with them. There are many intricacies to the ELF format specification but for the sake of disassembly we really only care about two sections. We care about the symbol table section and the text section. Let’s take a look:
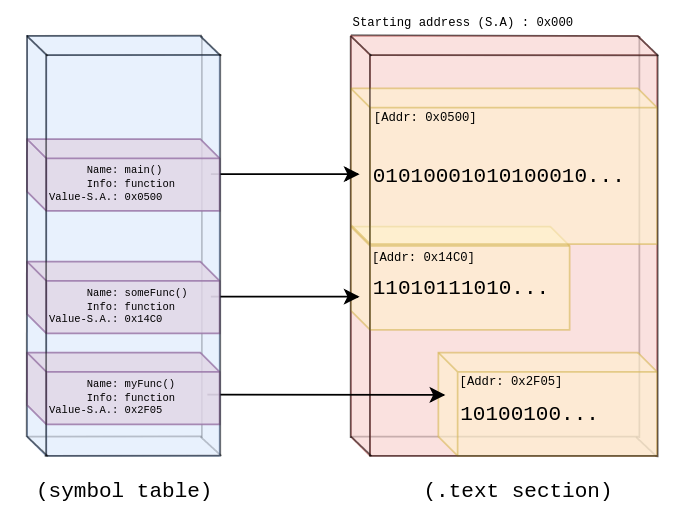
First let’s define the term symbol. This is any name identifiable object in our code. Variables, functions, types, and constants are all symbols. The Go compiler compiles each symbol and stores reference information about it in the symbol table. We can see in the debug/elf package’s definition of Symbol that each entry in the symbol table contains the symbol’s name, size, memory offset, and type:
Although it’s not clear by naming convention, the memory offset is stored in Value. By memory offset, I mean the number of addresses from the beginning of the .text section. This is the section where executable instructions (function symbols) defined in the actual program are stored. Also unclear by naming convention is the Info byte. This is a special value that conveys the type of the symbol. For the sake of our disassembler we only want to look at functions, so after doing some digging I discovered that Go uses the values ‘2’ and ‘18’ for its function symbols. This appears to be for arbitrary reasons.
So, with this knowledge it becomes clear that we want to extract the symbol table from the ELF binary and traverse through each symbol to find out where we can find the bytes to disassemble:
Let’s calculate the starting and ending indices of the symbol within the .text section’s array of bytes. For each symbol we want to subtract its Value from the text section’s starting address; this will give us the starting index. To calculate the ending index we just add the symbol’s size to the starting index. From there we can collect the bytes and feed them through Capstone.
We’re essentially finished now. We’re going to open up the .text section to get the starting address and raw data, do the address calculation for each symbol, run the data through Capstone, and print out the resulting instructions:
And that’s it! The full program can be found here. By leveraging some very powerful tools in the Go ecosystem we were able to build a fully functioning disassembler in under 75 lines of code! Thank you for reading and feel free to reach out via email for any questions or comments!
Recording of our disassembler in action:
